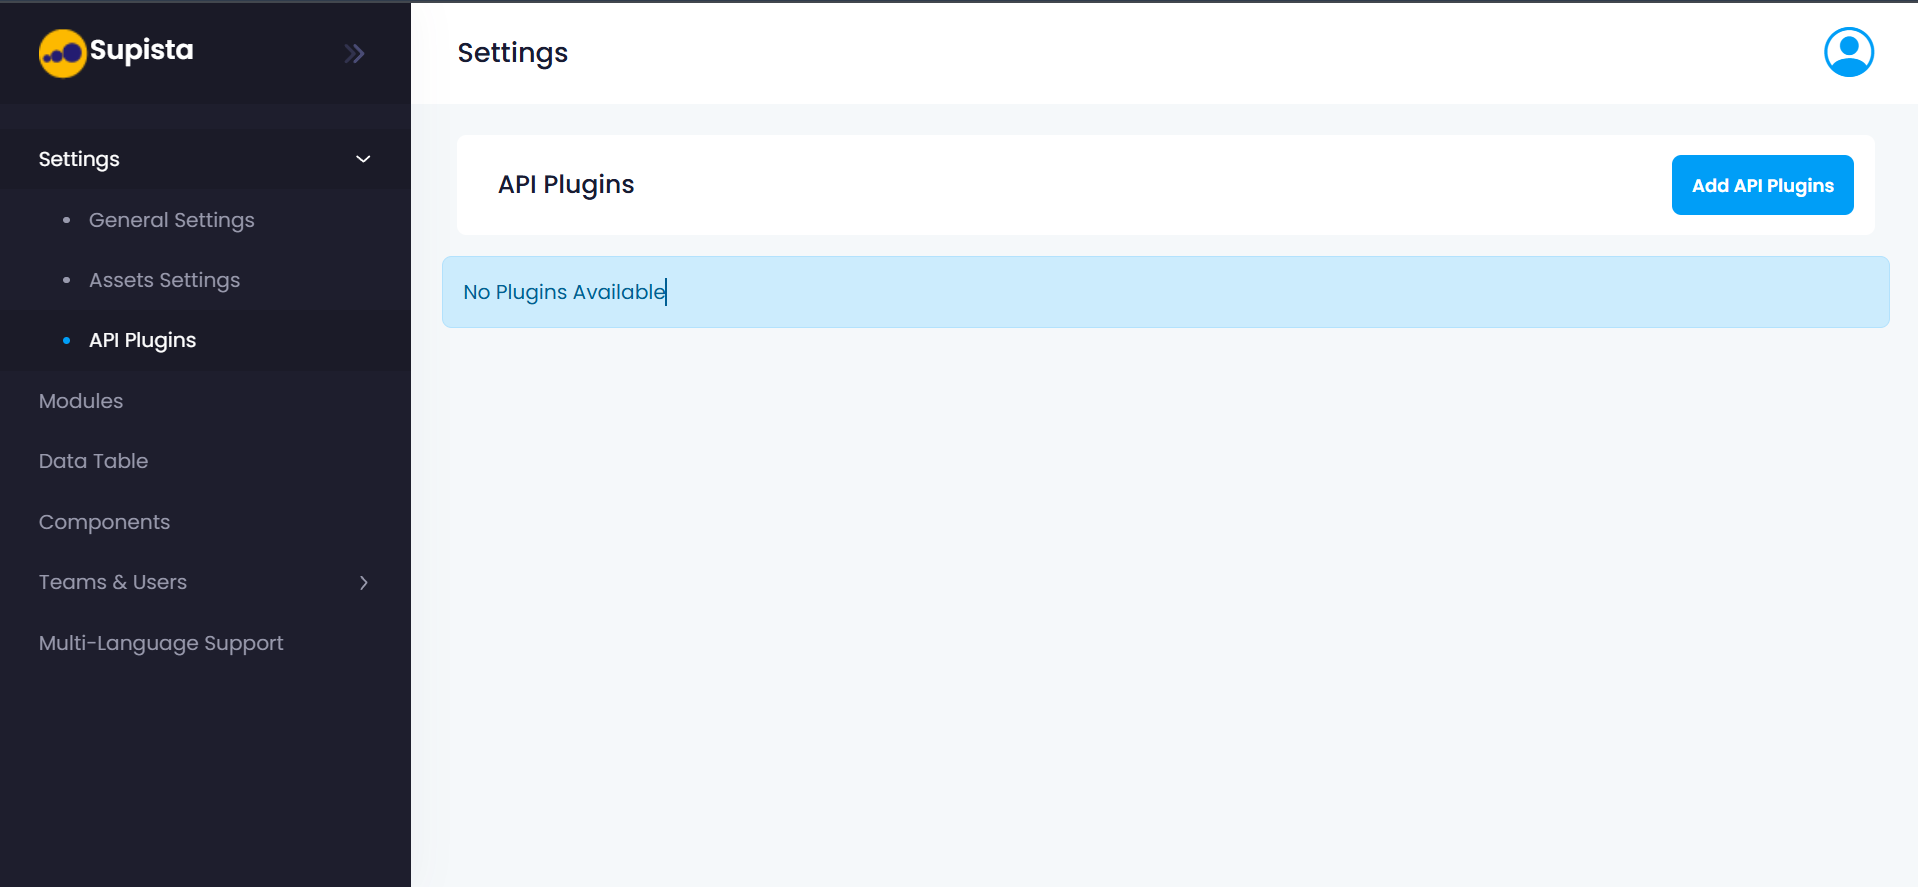
API Plugins
The API Plugins section allows Supista to integrate with external systems using configurable API endpoints. These plugins act as programmable connectors that enable external applications, automation services, or internal tools to send data into Supista and trigger logic within the platform.
Through API Plugins, administrators can define custom integrations without modifying the core system. Each plugin provides a unique webhook endpoint and a code environment where custom logic can be written to process incoming requests.
This enables Supista to interact with external ecosystems such as ERP systems, automation tools, data pipelines, or other third-party platforms.
Accessing API Plugins
Follow these steps to open the API Plugins section.
Step 1: Open the left navigation sidebar.
Step 2: Click Settings.
Step 3: Select API Plugins from the Settings menu.
The API Plugins page will appear. This page lists all existing plugins configured within the workspace.
If no plugins have been created yet, the page displays the message:
No Plugins Available
Creating a New API Plugin
To configure a new integration endpoint, follow these steps.
Step 1: Navigate to Settings → API Plugins.
Step 2: Click the Add API Plugins button located on the top right of the page.
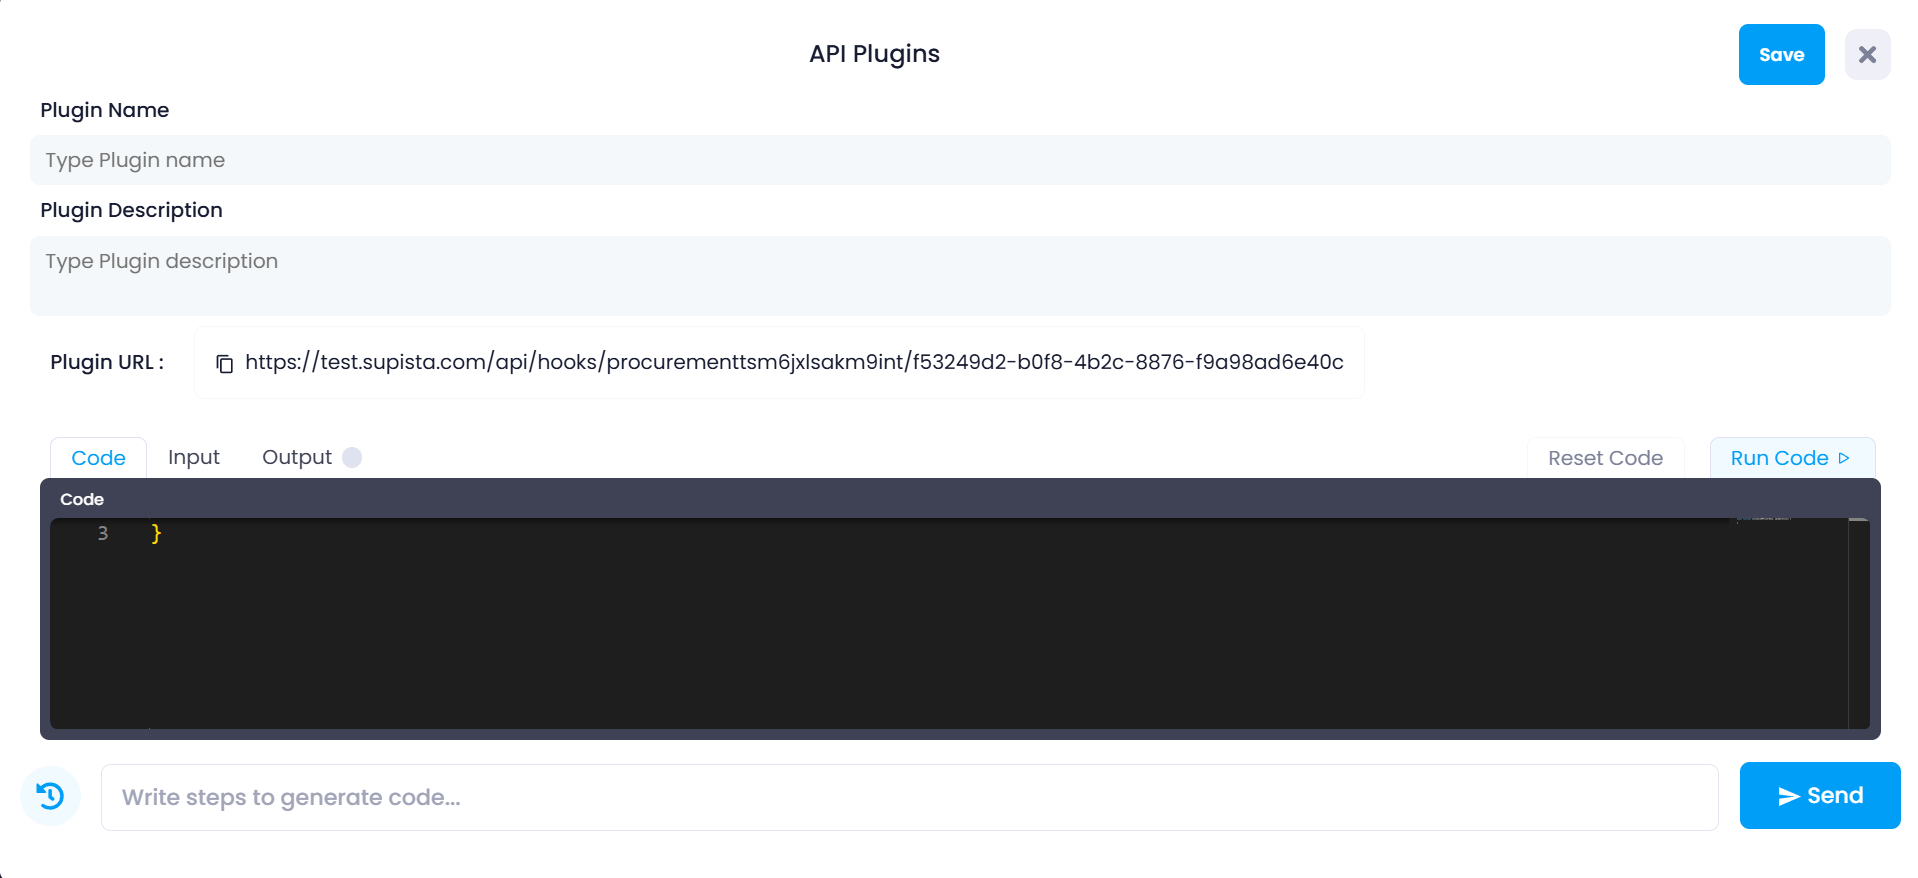
The API Plugin configuration interface will open.
Step 3: Enter the Plugin Name.
This name identifies the plugin within the Supista workspace.
Example names:
- Procurement Integration
- Vendor Sync API
- ERP Data Connector
Step 4: Enter the Plugin Description.
The description explains the purpose of the plugin. This helps administrators understand what the integration does.
Example descriptions:
- Sync vendor data from ERP system
- Receive procurement approvals from external workflow
- Push invoice data into Supista
Step 5: Review the Plugin URL generated by the system.
Supista automatically generates a unique webhook endpoint for the plugin.
Example:
[https://workspace.supista.com/api/hooks/\{workspace_id\}/\{plugin_id\}](https://workspace.supista.com/api/hooks/\{workspace_id\}/\{plugin_id\})
External systems will send HTTP requests to this URL to trigger the plugin logic.
You can click the copy icon next to the URL to copy the endpoint.
Understanding the API Plugin Interface
The plugin configuration page includes several important sections.
Plugin Information Fields
These fields define the identity and description of the integration.
Plugin Name
Identifies the plugin within the Supista workspace.
Plugin Description
Explains the purpose of the integration and the type of external system interacting with Supista.
Plugin URL
The Plugin URL is the webhook endpoint used by external systems.
When an external service sends a request to this URL:
- Supista receives the request
- The plugin code is executed
- The incoming data is processed
- A response is returned
This allows Supista to react to events happening outside the platform.
Code Editor
The lower section of the interface contains a built-in code editor.
This editor is where custom logic for the plugin is written.
The editor executes a function that processes incoming data sent to the plugin URL.
Inside this code block, developers can:
- Validate incoming payloads
- Transform data
- Create or update records
- Trigger workflows
- Send responses back to the requesting system
This makes the API Plugin system highly flexible and suitable for complex integration workflows.
Code Editor Tabs
The interface includes three testing tabs.
Code
The Code tab contains the JavaScript logic that runs when the plugin endpoint receives a request.
This is where the main integration logic is written.
Input
The Input tab allows users to simulate incoming request data.
This is useful for testing how the plugin behaves when it receives data from an external system.
Users can enter sample JSON payloads representing the request body.
Output
The Output tab displays the result produced by the plugin logic after execution.
This allows developers to verify whether the plugin processes data correctly.
Running and Testing Plugin Code
Supista provides built-in testing capabilities for API plugins.
Step 1: Write or modify the plugin logic inside the Code editor.
Step 2: Open the Input tab.
Step 3: Enter a sample payload representing incoming request data.
Example:
{
  "vendorName": "ABC Suppliers",
  "invoiceAmount": 15000
}
Step 4: Click Run Code.
Supista will execute the code using the sample input.
Step 5: Review the result in the Output tab.
This helps ensure the plugin behaves correctly before activating it.
Resetting Plugin Code
If necessary, the code editor includes a Reset Code option.
Step 1: Click Reset Code. Step 2: The editor will revert to the default code template.
This is useful if you need to start over or remove previous logic.
Generating Code Using Instructions
Below the code editor is a code generation input field.
Users can type instructions describing the required logic.
Example:
Create a record in the Vendors table when a new vendor is receivedStep 1: Enter the desired instructions. Step 2: Click Send.
The system will generate code suggestions based on the provided instructions.
Saving the API Plugin
Once configuration and testing are complete, the plugin must be saved to activate it.
Step 1: Review the plugin name, description, and code logic. Step 2: Click the Save button.
After saving:
- The plugin becomes active
- The Plugin URL becomes live
- External systems can begin sending requests to this endpoint
How API Plugins Work
Once activated, the workflow operates as follows:
- An external system sends a request to the Plugin URL.
- Supista receives the incoming data.
- The plugin code is executed.
- The data is processed according to the defined logic.
- The plugin returns a response.
This allows Supista to integrate seamlessly with external applications.
Use Cases for API Plugins
API Plugins can support many integration scenarios.
Examples include:
- Importing records from external ERP systems
- Synchronizing vendor data
- Receiving webhook events from automation platforms
- Triggering workflows from third-party applications
- Processing external form submissions
Summary
The API Plugins section enables Supista to connect with external systems through programmable integration endpoints.
By providing a webhook URL, a built-in code editor, and testing tools, Supista allows administrators and developers to build powerful integrations that automate processes, synchronize data, and extend the platform beyond its internal environment.